Configure KVM Virtual Machine in RHEL6
Virtualization is generically defined as the ability to run multiple operating systems simultaneously on a single computer system. Virtualization has come to prominence in recent years because it provides a way to fully utilize the CPU and resource capacity of a server.
Virtualization is also useful in terms of trying out different operating systems without having to configure dual boot environments. For example, you can run Windows in a virtual machine without having re-partition the disk, shut down Red Hat Enterprise Linux 6 and then boot from Windows.
Prior to Red Hat Enterprise Linux 6 two virtualization platforms were provided with RHEL in the form of KVM and Xen. With the release of RHEL 6, support for Xen has been removed.
Third party solutions are also available in the form of products such as VMware, vitual pc and Oracle VirtualBox. Since KVM is supplied with RHEL 6, however, this is the virtualization solution that will be covered in this chapter.
KVM Hardware Requirements
Firstly, KVM virtualization is only available with either Intel-VT or AMD-V technology.
To check for Intel-VT support, run the following command in a terminal window to check for the presence of vmx:
# grep vmx /proc/cpuinfo
To check for AMD-V support, run the following command which checks for the presence of svm
# grep svm /proc/cpuinfo
Ofter verify your supportable cpu you also need to check that Vitualization feature is enabled from BIOS. KVM virtualization is only available for 64-bit (x86_64 architecture) versions of the operating system. also check other requirement.
6 GB free disk space.
2 GB of RAM.
Ofter fulfill H/W Requirement, install the packages
#yum install virt-manager libvirt libvirt-client
#yum install libvirt-python python-virtinst
#yum install qemu-kvm qemu-img
Now start the service
#service libvirtd start
#chkconfig libvirtd on
step 1. Open virt-manager
Run the virt-manager tool by selecting the Applications -> System Tools -> Virtual Machine Manager menu If the QEMU entry is not listed, select the File -> Add Connection menu option
Step 2. Specify name and installation type
Select File-> New virtual machine-> Give machine name and select Installation media type

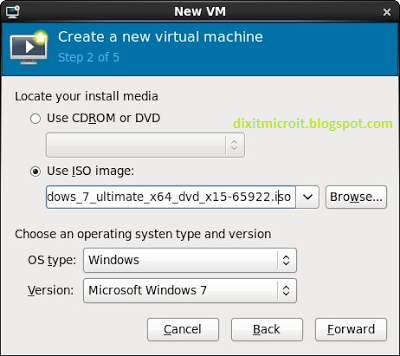
Step 3. Configure installation
Click Forward-> Select OS type and Version-> Click Forward
Step 4. Configure CPU and memory
Select the number of CPUs and amount of memory to allocate to the virtual machine and click Forward.

Step 5. Configure storage
Assign sufficient space for your virtualized guest and any applications the guest requires, then click Forward to continue here you may face problem so you can create a partition(e.g /dev/sda4) and assign it for store
guest.

Click to Forward-> Finish
The final screen displays a summary of the configuration, click to Finish. now installation should began follow its process.
No comments:
Post a Comment