Monday, September 15, 2014

Using Active Directory Snapshot and Dsamain Tool

A snapshot is a form of historical backup that captures the exact state of the directory service at the time of the snapshot was taken. You can recover deleted AD items form snapshot taken by you if the Object that you want to recover was present at the time of snapshot creation.

Step 1: Creating an AD DS Snapshot

  1. Open the command prompt.
  2. Type ntdsutil press Enter.
  3. Type snapshot press Enter.
  4. Type activate instance ntds press Enter.
  5. Type create press Enter.
  6. You should get a successful creation message with a unique GUID number for each snapshot, copy it.
  7. Exit from the command prompt. And delete Dixit user that we have created in previous post from AD to test Snapshot.


 Step 2: Mount an Active Directory snapshot

  1. Open cmd prompt as a Admin privilege type ntdsutil (a command line utility to manage AD database).
  2. Type snapshot then press Enter:
  3. Type activate instance ntds press Enter
  4. Type list all press Enter
  5. Type mount <GUID> is the GUID returned by the Create command in Step 1.
  6. Type quit press Enter
  7. Type quit press Enter
  8. Type the following command to add your snapshot with LDAP instance.
  9. Type dsamain /dbpath C:\$SNAP_datetime_volumec$\windows\ntds\ntds.dit /ldapport 44000 press Enter


Step 3: Explore a snapshot with Active Directory Users and Computers

  1. Switch to Active Directory Users and Computers. Right-click and then click Change Domain Controller.
  2. Click <Type a Directory Server name[:port] here>, type seat2.mumbai.com:44000, and then press Enter. Click OK. (replace your domain name and port number).
  3. Double-click mumbai.com.
  4. Double-click the Sales OU.
  5. Locate the Dixit user account object. Note that the Dixit object is displayed because the snapshot was taken prior to deleting it. Great You have done this.

Step 4: Unmount an Active Directory snapshot
  1. You can also unmount AD snapshot if there is no requirement for it, Follow next steps to achieve this.Open command prompt as an admin privilege and Type the following commands:
  2. Type ntdsutil press Enter
  3. Type snapshot press Enter
  4. Type activate instance ntds press Enter 
  5. Type list all press Enter 
  6. Type unmount guid (replace guid with your snapshot GUID).
  7. Type list all press Enter.
  8. Type quit and exit form cmd.


If you encounter any error kindly drop your query in the comment box.

How To Enable Active Directory Recycle Bin

Configuring the Active Directory Recycle Bin
AD Recycle Bin allow you to restore accidentally deleted AD objects without the need of restoring complete AD Database, but first of all, you need to Enable this feature. So that is what we are going to describe.

Step 1: Enable the Active Directory Recycle Bin
  1. Login to your Server, Open Server Manager, click Tools, and then click Active Directory Administrative Center (ADAC).
  2. Click (Mumbai local) (My Domain Name).
  3. In the Tasks pane (Right Corner), click Enable Recycle Bin, click OK, and then click OK.
  4. Press F5 to refresh ADAC.


Step 2: Create and delete test users
  1. Either from Active Directory Administrative Center, or from Active Directory Users and Computers
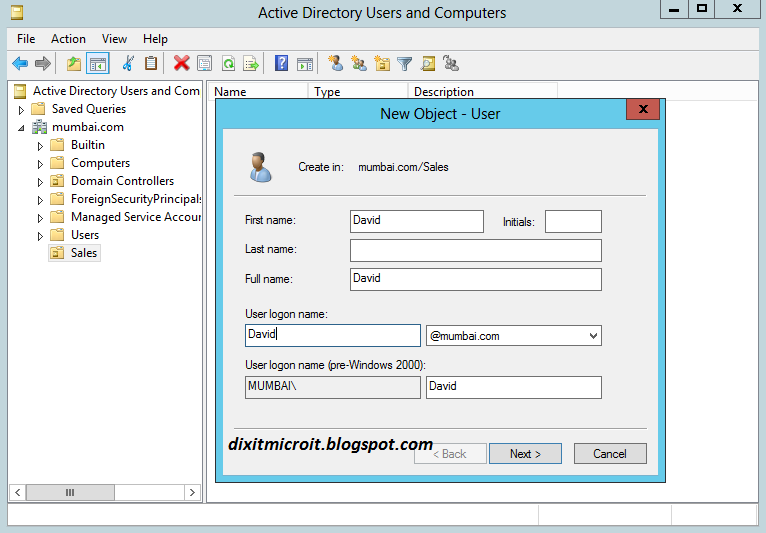
  2. Select Sales OU and create new User with the following information, and then click OK.

  •  Full name: David
  •  User UPN logon: David
  •  Password: Pass@123
  •  Confirm password: Pass@123


    1. Repeat the previous steps to create a second user, Dixit.
    2. Select Dixit. Right-click the selection, and then click Delete.
    3. Click Yes at the confirmation prompt.
    Step 3: Restore the deleted users
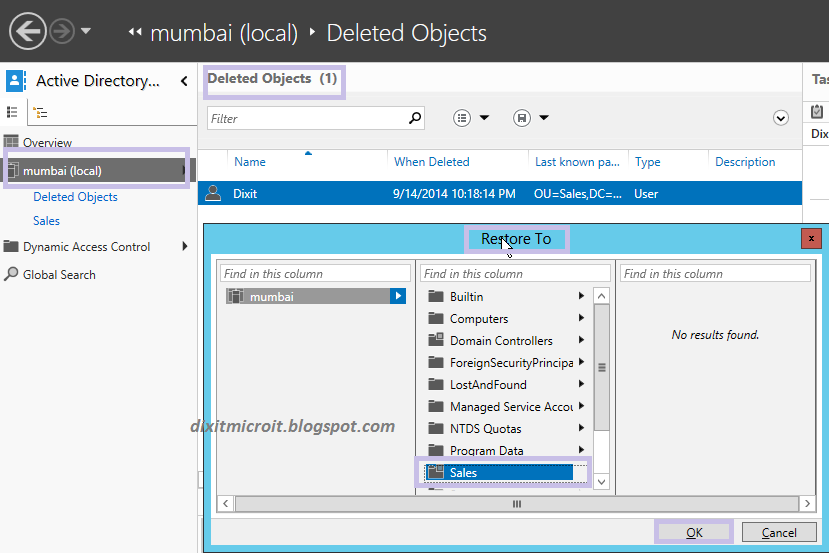
    1. In Active Directory Administrative Center, click Mumbai (Local), and then double-click Deleted Objects. 
    2. Right-click Dixit, and then click Restore To.


    3.In the Restore To window, click the Sales OU, and then click OK.
    4.Confirm that Dixit is now located in the Sales OU. 

    I hope you have enjoyed this new feature. Write comment if you have any query regarding this topic.

    DHCP Backup and Restore with Windows Server 2012

    The DHCP database is a dynamic database containing data that is related to scopes, address leases, exclusions and IP reservations.

    By default, the DHCP database files are stored in the %systemroot%\System32\Dhcp folder.

    You can back up a DHCP database manually, or you can configure it to back up automatically. An
    automatic backup is called a synchronous, A manual backup is called an asynchronous backup.

    Using Netsh (You can also use GUI method for same from dhcp management console)

    You can use netsh commands to back up the database; this is useful for backing up the database to a remote location using a script file.

    The following command is used to Export and import dhcp database. (DHCP data for all scopes)
    Open CMD as admin privilege and type following command.
    Syntax:
    netsh dhcp server export "c:\YourFolder\YourFile.txt" all

    Netsh utility for DHCP backup restore

    Example:
    netsh dhcp server export "c:\Database\DhcpFile.txt" all
    To restore the DHCP database, use the following command:
    Syntax:
    netsh dhcp server import "c:\YourFolder\YourFile.txt" all

    Example:
    netsh dhcp server import "c:\Database\DhcpFile.txt" all
    Nice you finished it.
    Note: If you are using this command on same server for testing purpose, kindly remove scopes from dhcp console before restoring otherwise you might get error like existing database.

    Tuesday, February 11, 2014

    What is Cloud Computing


    Hello friends today i am going to describe a highly demanding computing model in now days,  that is what called Cloud Computing. Cloud Computing is a computing model, not a technology where customers join the “cloud” to access IT resources  (such as disk space, servers, desktops and softwares) which are priced on the base of on-demand (means you need to pay for that you want to use).


                                              Image source www.tvgconsulting.com


    Basically IT resources are rented and shared among multiple consumers much like as we takes office space, apartments, or house rooms on lease or rent from our landlord.  In a very simple way, cloud Computing is simply IT services sold and delivered over the Internet.

    A key point to remember is that your data resides on someone else’s server (cloud service providers).
    The most concerns is to trust and control issues, are you really want to trust on cloud service providers.
    I know that you may have some questions about Cloud Computing, here is most popular question asked by IT candidates:

    Why we need to use Cloud computing when we can create and/or configure our own network, resource, or service?

    Yes you are right but first of all tell me, Why we takes rooms, flats, on rent or lease when we can make or purchase our own home. Yes we can create your own IT Setup also but there are some conditions when we can't do this.

    1- I don't have sufficient money to deploy our own IT setup.
    example: I have just $1000 budget and home bid is $5000 so how i can purchase this.

    2- We just want to deploy our IT setup for short time period (temporary).
    Example: I have contract for a  project on LINUX based system up to six month only.

    3- We want to switch to any technology, anytime whenever required rapidly.
    For example i want to switch from MICROSOFT to REDHAT technology.

    The Cloud computing may be solution for all of the above problems.

    Cloud Computing service providers combine virtualization, and Internet connectivity technologies to provide the service. Cloud computing is not new technology but are packaged, sold and delivered in a new way.

    Types of Cloud Computing
    1- SaaS (Software As A Service)
    Is the most widely known and used form of cloud computing. It provides all the functions of a traditional application to many customers and often thousands of users, but through a Web browser, not a locally-installed application. Means you can access software from your web browser that are installed on Cloud provider's end.
    Example: Applications like Gmail, Yahoo mail etc, Social Networking sites like Facebook etc.

    2-PaaS (Platform as a Service)
    Delivers virtualized servers on which customers can run existing applications or develop new ones without
    having to worry about maintaining the operating systems, server hardware, load balancing or computing capacity. Means you can purchase a virtual Server from Cloud providers instead of purchasing it physically.
    Example: Windows azure, Force.com, Google App Engine.

    3-IaaS (Infrastructure as a Service)
    IaaS is designed to replace the functions of an entire data center including virtualized server, network, storage and softwares. This saves a lot of time and expense.
    Example Amazon.com 

    Please like and share, if this is useful for you

    Monday, February 10, 2014

    How to Install RHEV Hypervisor

    Install Red Hat Enterprise Virtualization Hypervisor
    Ofter successfully installing Red Hat Enterprise Virtualization Manager (in my previous post). The next step is to install your Red Hat Enterprise Virtualization Hypervisor hosts, which will be used to run your virtual machines.
    Follow these steps

    1. Download the latest version of the rhev-hypervisor* package from Red Hat Network.

    2. Install the RPM on a Red Hat Enterprise Linux system.

    # yum localinstall rhev-hypervisor*.rpm

    3. Insert a blank CD into your CD writer. Use the cdrecord utility to burn the hypervisor ISO image
    onto your disc. (you can also install RHEV-H through PXE Lan if you have allready configured RIS server).

    # cdrecord dev=/dev/cdrw /usr/share/rhev-hypervisor/rhev-hypervisor.iso

    Now you can use it to boot the machine to install Red Hat Enterprise Virtualization Hypervisors
    Follow therse steps:
    1. Insert the RHEV Hypervisor installation CD into your CD-ROM drive and Reboot the machine.

    1-Select boot from the hypervisor installation media.

    2. Select Install RHEV Hypervisor.

    3. Ensure that the local internal hard drive as the boot device and select Continue.

    4. Select local internal hard drive a the installation device and select Continue.

    5. Enter a password for local console access and confirm it.

    6. Select Install and press Enter.

    7. Once installation is complete, Reboot the hypervisor. Remove the installation disc.

    8. After rebooted, you will be taken to a login shell. Log in as the admin user with the password you provided .

    Now you have console of Hypervisor where you can configure RHEV-H according to your Lab setup.

    A. Select the Network tab. Fill in the required fields as shown in the following example. Enter the DNS and NTP Server address according to your environment.(192.168.0.254 in my case).
    hostname:  localhost.localdomain .
    DNS1:      192.168.0.254
    NTP1:       192.168.0.254


    Select Apply and press Enter.

    Select eth0 device and press Enter to access the interface configuration menu to configure IP Address.

    Under IPv4 Settings, select DHCP or Static IP addressing. for example
    IP= 172.124.0.201 Mask=255.255.255.0
    GW= 172.24.0.254

    Select Apply and press Enter.

    C. Select the RHEV-M tab. Configure the following options:
    • In the Management Server field, enter rhevm.pod0.example.com (This will be your Management Server, means RHEV-M in my case it is rhevm.pod0.example.com).

    • In the Management Server Port field, enter 443.

    • Tick the Connect to the RHEV Manager and Validate Certificate checkbox.

    D. The Set RHEV-M Admin Password field allows you to specify the root password for the hypervisor, and enable SSH password authentication from the Red Hat Enterprise Virtualization Manager.

    Select Apply and press Enter. validate its certificate. Select Approve and press Enter.

    Accept all other default settings.

    E. Finally, select the Status tab. Select Restart and press Enter to reboot the host and apply all changes.
    You have now successfully installed a Red Hat Enterprise Virtualization Hypervisor.


    Sunday, February 9, 2014

    RHEV Manager Requirements

    Requirements of RHEV
    This post outlines the hardware and software requirements for installing the Red Hat Enterprise Virtualization platform. The requirements outlined herein are based on the minimum requirements for successful installation and configuration of a Red Hat Enterprise Virtualization environment. Production RHEV installations may have additional requirements depend on infrastructure.

    Hardware requirements
    To setup a Red Hat Enterprise Virtualization environment it is necessary to have, at least:

    • One machine to act as the management server(RHEV-M).

    • One machine to act as virtualization hosts(RHEV-H).

    • One machine to use as client for accessing the Administration Portal.

    • Storage infrastructure provided by NFS, iSCSI, SAN, or local storage.

    Management Server Requirements (RHEV-M
    The minimum hardware requirements outlined here are based on a typical small to medium sized installation.
    ===============================================================================
     Minimum                                                                Recommended
    ===============================================================================
    A dual core CPU.                                                     A quad core CPU

    4 GB of available system RAM.                                16 GB of system RAM.

    25 GB of locally free disk space.                               50 GB of locally free disk space

    1 NIC with bandwidth of at least 1 Gbps.                  1 NIC with bandwidth of at least 1 Gbps
    ===============================================================================

    Virtualization Host Requirements (RHEV-Hypervisor).

    A- CPU:  The Intel64 or AMD64 CPU extensions, and the AMD-V or Intel VT hardware virtualization extensions.

    B- RAM: Virtualization hosts must have at least 10 GB of RAM and additional 1 GB for each virtual machine.

    Software Requirements
    Directory Services
    Currently the two supported providers of directory services for use with the Red Hat Enterprise Virtualization Manager are Identity, Policy, and Audit (IPA) and Microsoft Active Directory. You will be able to learn IPA configuration soon on my blog as i am preparing for this.

    Client Requirements.
    To access the Administration Portal, you need a client with a supported web browser. The Administration Portal supports the following clients and browsers:

    Clients.
     A-Windows XP,
     B-Windows 7 (x86, AMD64 and Intel 64), and
     C-Windows 2008/R2 (x86, AMD64 and Intel 64).

    Browser.
     Internet Explorer 7 and higher on Windows, with the .NET Framework 4 installed. Firefox 10 or higher With SPICE plugin.

    To check CPU Parameters use following commands:
    #grep --color -E 'vmx|svm' /proc/cpuinfo 
    you should see vmx flag for Intel or svm flag for AMD processor.

    #grep --color -E 'nx' /proc/cpuinfo
    you should see nx (No execute) flag is required for Hyper visor Installation.

    Check detail of above options here
    grep                =command to match pattern
    --color             =display matched pattern highlighted
    vmx|svm         =cpu flags required for virtualization vmx for Intel and svm for AMD processor
    /proc/cpuinfo =file that contains the system information
    nx                   =no execution a flag that prevent buffer overflow attack, must be present for hypervisor.

    Saturday, February 8, 2014

    Installing RHEV Manager

    Installation
    Hello my dear friends in my previous post i have discussed a lot of about virtualization specially about Redhat virtualization, now its time to go for in deep, that is how to install RHEV-M. The Red Hat Enterprise Virtualization Manager and all of its dependencies are available via Red Hat Network ensure that you have all required packages and then follow simple steps to install RHEV-M.

    Use yum to ensure that the most up to date versions of all installed packages are in use.
    # yum upgrade

    Update all existing packages and reboot necessary.
    #yum update -y
    #reboot 


    Use yum to initiate installation of the rhevm package and all dependencies.
    # yum -y install rhevm rhevm-reports

    Configuration
    Once package installation is complete the Red Hat Enterprise Virtualization Manager must be configured. The rhevm-setup command is used to perform this task. Use following steps to configure RHEV-M.

    1. Start Setup Script
    To begin configuring the system run rhevm-setup as the root user.
    # rhevm-setup
    Stop ovirt-engine service: yes
    Override current httpd configuration:yes

    2. Set Port for HTTP
    The script prompts for entry of the port to use for HTTP communication. If you want to change it change value press Enter.

    HTTP Port [80] :

    3-Set Port for HTTPS
    The script prompts for entry of the port to use for HTTPS communication.
    HTTPS Port [443] :

    4-Set Fully Qualified Domain Name (FQDN)
    The script prompts for entry of the system's fully qualified domain name Host fully qualified domain name, note that this name should be fully resolvable
    [rhevm.pod1.example.com] :

    5-Set Administrator Password
    The script creates an authentication domain internal to the Red Hat Enterprise Virtualization Manager for the default administrative account
    Password for Administrator (admin@internal):example


    6- Set Organization Name
    The script prompts for entry of the Organization Name appears in the Subject field of the certificate
    Organization Name for the Certificate :Red Hat Training

    7- Configure Default Storage Type
    The script prompts for selection of the default storage type that is used for the Default data center:NFS

    8- DB Type: local

    9- Set Database Password
    Database password (required for secure authentication with the locally created database) :example

    10- Configure NFS ISO Domain An ISO storage domain is used to store copies of removable media for use when provisioning and using virtual machines
    Should the installer configure NFS share on this server to be used as an ISO Domain?
    ['yes'| 'no'] [yes] :

    11- Local ISO domain path:/exports/rhevisos

    12- Configure Firewall
    Configure iptables:no

    Press Enter to apply the configuration  otherwise type no to reconfigure.

    Once the configuration values are applied. A number of services need to be started

    13- Execute the rhevm-dwh-setup and rhevm-reports-setup command and select following options:
    #rhevm-dwh-setup
    Stop ovirt-engine service :yes
    #Rhevm-reports-setup
    Choose a password for admin users: redhat

    12- Bind to the example.com domain authenticate as user rhevadmin with a password of  redhat by using following command. (however you can use local user also).

    #rhevm-manage-domains -action=add -domain=example.com -user=rhevadmin -provider=IPA -interactive
    Enter password:redhat
     #service ovirt-engine restart
    Result: The Red Hat Enterprise Virtualization Manager has been installed and configured successfully. You
    are now able to connect to the Administration Portal for the first time.

    To access RHEV Manager open your browser and please go to the following URL: http://rhevm.pod1.example.com

    1-Accept self-signed certificate

    2-Click on web admin portal

    3-Enter username(admin), password(redhat) & internal domain.

                                                                                See screenshot  here
     

    4-Click on configure link.

    5-Click on system permissions.

    6-Click add and search rhevadmin

    7-Select rhevadmin user choose Superuser from Role to Assign click ok and close

    8-Logout from admin and try to login with rhevadmin user with example.com.

    Please like and share if it is useful for you.

    Friday, February 7, 2014

    Redhat Virtualization

    Virtualization

    Hello guy's finally i have decided to come with highly demanded technology in nowdays, that is virtualization. So here we are going to start a new series for Redhat Virtualization. I hope this will help you to understand virtualization technology and keep in touch for more upcoming posts.

    Introduction: 

    Virtualization is a technology that allows a physical system to be partitioned into multiple virtual systems which may each run its own Operating System simultaneously. These virtualization machines are isolated (independent)  from each other. Some major advantages of virtualization are:
    1- Reduce management cost.

    2- Lower operating costs.

    3- Reduced power consumption.

    4- Greater overall reliability.

    5- Require less physical space.

    6- Allow live migration and much more.

    Virtualization Types

    1-Full virtualization
    Allow unmodified Operating systems and software's to be run on virutal machine exactly like as it were running on real hardware.

    2- Hardware Assisted Virtualization
    The development of Intel-VTx and AMD-V allow H/W assisted virtualization possible where CPU helps to Hypervisor to more efficience virtualization.

    3- Parra-virtualization
    Same kernel can be used for both physical and virtual machines that allow better performance.

    There are so many organizations involved in this technology and each-one have its own features and limitations but in this post i will just going to discuss about REDHAT Virtualization technology.

    Red Hat Enterprise Virtualization platform consists of one or more hosts and at least one manager. The virtual machines are hosted on the hosts. To understand this technology you should be familiar with some components of virtualization.

    1-Red Hat Enterprise Virtualization Manager (RHEV-M)

    The Red Hat Enterprise Virtualization Manager acts as a centralized management system that allows system administrators to view and manage virtual machines and images. It's a tool that runs on RHEL6 O.S.

    The manager provides a graphical user interface to administer the whole virtual environment infrastructure. The RHEV-M can be manage through Administration Portal, User Portal, and an Application Programming  Interface (API).

    1- The Administration Portal is used to perform setup, configuration, and management of the Red
    Hat Enterprise Virtualization environment.

    2- The User Portal is used to start, stop, reboot, and connect to virtual machines but you can not perform all tasks like as admin portal.

    3- The REST API provides and interface for automation of tasks.

    Red Hat Enterprise Virtualization Hypervisor (RHEV-H).
    RHEV-Hypervisor is a fully featured virtualization platform for quick, easy deployment and management of  virtualized guests.

    Red Hat Enterprise Linux Host(s).
    The Red Hat Enterprise Virtualization Manager also supports the use of systems running RHEL6 AMD64/Intel64  versions as virtualization hosts (Means KVM as a Hypervisor).

    =============================================
    Red Hat Enterprise Virtualization Platform Overview
    =============================================
    Image source: www.redhat.com

    1- This section used to provide authentication for users that may be LDAP/IPA or Active directory service.

    2- PostgreSQL: This section define the database storage for entire virtual platform where all the will be stored.

    3- VDSM is a service that is used to manage RHEV-Hypervisor and RHEL6 hosts by RHEV-manager.

    4- This section describe protocols (SPICE or VNC) that can be used to take the console (means display) of RHEV-H.

    5- This is a central point of administration for Linux virtual platform and managed by a tool called RHEV-M.

    6- This is a point where administrator can administer RHEV-M through web interface, user can access virtual  machine through web interface, or this can be achieved via REST API (script based xml language) interface.


    Thursday, February 6, 2014

    What is Difference between Workgroup and Domain


    WORKGROUP AND DOMAIN
    Hello my dear friends as we all know very well about network through which we can share and access information from one location to another location. A computer network can be divided logically in to two networking models:
    • Work-group
    • Domain
    Workgroup is a peer-to-peer network while domain is a server-based network. The important differences between the two models are listed below:


    WORKGROUP
    DOMAIN
    1. It is a peer-to-peer networking model.
    1. It is a server-based networking model.
    2. There is no client and no server. All the computers are equal in status.
    2. There is a centralized dedicated server computer called Domain Controller (DC) which controls all other computers called Clients.
    3. This model is recommended for small networks (up to 10 PCs).
    3. This model is recommended for large networks.
    4. There is no centralized administration and each computer is administrated separately.
    4. There is centralized administration and each PC can be administrated and managed from the server.
    5. There is only distributed processing.
    5. Both centralized and distributed processing of resources happens.
    6. In this model, low-grade OS like 2000/XP professional, win 98 etc. can be used.
    6. In this model, high-grade OS like Win /2003/ server on the server end.
    7.Workgroup can be given a name like sales, HR, accounts etc.
    7.Domain can also given a name like xyz.com, abc.com etc.
    8. User accounts are created in each PC and are called ‘Local Users’.
    8. User accounts are created only in the server (DC) and are called ‘Domain Users’.

    By default, the name of 'Workgroup' is Workgroup. however you can change it 

    1-To change Workgroup Name:

    2-right-click on My Computer


    3-properties >  

    4-Computer name > 

    5-Change >

    6-Workgroup

    7-Type the name > O.K.

    8-Restart the PC.

    In a Workgroup network, name of Workgroup in every PC will the same. For example, if in your network, there are 10 computers and the name of Workgroup is Sales. So every computer will have Workgroup name as ‘Sales’. Click on ‘My Network Places’ > Entire Network > Microsoft Windows Network > you can see the name ‘sales’ > Click on the sales > you can see names of computers present in the Workgroup Sales. Click on a computer name to view its shared folders.
    To create a Domain network, you have to first create a Domain Controller (DC) and then client computers are made member of the domain.
    Read my active directory blogs for more information about Domain.

    please share and like this, if it is useful for you.

    Active Directory Group Types


    Group are collection of users with some common attributes for easy management. Before creating groups in Active Directory i will recommend you to understand basic concept about group types and strategy. Today i am going to describe group types in active directory and hope this will help you to clear your concept.

    Group Types:

    1- Distribution

    These groups are basically used by email application such as exchange server.
    Distribution group does not have SID (Security Identification id).
    They can not be used for security purpose.

    2- Security
    These types of group have a unique SID (Security Identification id).
    They are used for security purpose.

    Group Scope

    Group Scopes are divided on the base of

    Replication :     Where it can be replicate.
    Membership :   What type object it can add.
    Availability :      Where it can be used.

    There are following group scopes are available.

    A= Local Group
    Members:    Users ,computers, local groups, global groups, and universal group from any domain in the forest.

    Replication:  Membership can not replicate with other system.

    Availability:  Only computer wide scope, local group can not be member of any other group.

    B= Domain local:
    Members:     Users, computers, global gropus, and universal group

    Replication:  Membership are replicated in every domain controller in the domain.

    Availability:  Available for only same domain.


    C= Global group:

    Membership: Limited membership only users, computers, and other global group can member of Global group.

    Replication: All domain controllers in the domain.

    Availability: Any domain in the forest, and trusting domain.

    D= Universal group:
    Membership: Users, computers, global groups, universal groups.

    Replication:   Replicated via Global catalog.

    Availability:   Available in everywhere in the forest.

    Please share and like this if this is useful for you and your friends.

    System error 5 has Occurred


    Most of the users faces a problem with running many commands that shows system error 5 has occurred even running command with administrator user.


    Reason:
    There are two types of administrator in windows.
    1- Built-in that is created by system automatically (has Full Authority).
    2- Mad-in that is created by you during installation or later (has authority less than built-in).

    So error occurred because you are trying to run command with mad-in administrator but some commands run  only with built-in administrator. In most of the windows operating system built-in administrator is
    disabled by default. So you may need to enable this administrator  then you can run any command from cmd prompt.

    How to enable built in administrator.
    1-Click on Start button type cmd in search box
    2-Right click on cmd select run-as administrator and you will access cmd prompt  with full admin rights.


     Now you can enable built-in administrator  by typing following command.
     net user administrator /active:yes
     yes means enable.
     no means disable.


     Note:You can also run any other command directly on cmd without error.

    Note: Please share and like this post if this is useful for you.

    Wednesday, February 5, 2014

    New Changes in CCNA Exam

    Hello guy's as we all know that CISCO has recently changed their CCNA code as well as syllabus also. Old code (that was 640-802) is now replaced by new code (that is 200-120).
    www.cisco.com

    Here are some list of topics that are included in new CCNA exam code and you should we aware about these if you belongs to IT sector and interested in CISCO technology. I hope this will help you and you will like this post.

    1- NTP Network Time Protocol.

    2- RSTP Rapid Spanning Tree Protocol.

    3- PVSTP Per-VLAN Spanning Tree Protocol.

    4- IPV6 Routing in Detail.

    5- OSPF with Multi Area.

    6- FHRP First Hop Redundancy Protocol .

    7- HSRP Hot Standby Router Protocol.

    8- VRRP Virtual Router Redundancy Protocol .

    9- GLBP Gateway Load Balancing Protocol .

    10- SNMP Simple Network Management Protocol.

    11- Syslog A service that is used to store the logs of Router.

    12- NetFlow An application for collecting IP traffic information.

    13- GRE Tunnel A tunneling protocol that can encapsulate many protocols inside IP tunnels.

    Tuesday, February 4, 2014

    How to remove any virus without antivirus

    There are some some Folder Viruses that can not be deleted directly even sometimes through Antiviruses so you can delete by a software called Unlocker. So download this software from given link and install it.  

    http://www.filehippo.com/download_unlocker/
    Ofter installing Right click on Folder that you want to delete (e.g $Recycle.Bin) and select unlocker then you will see a windowas shown in figure.


    like below figure and select delete from drop down then ok, it should be delete now.

    Thursday, January 30, 2014

    How to block facebook id if someone using my photo

    Hello guys if someone other are using your photo's or pics that belongs to you or yours family member. You can block these photos by reporting to Facebook Authority, to do this you just need to follow these simple steps as given by me.

    1-Open your browser and paste this url to open facebook violation reporting page.
    https://www.facebook.com/help/contact/274459462613911
                                                       You will see next page look-like this.
    2- Select your action that you need for example someone is using my photos.
                                                                 see following screen shot


    3-You should be redirected in next page where you need to select option according to you.

                                                       see following screen shot as given below.


    4- Click fill out this form to submit your claim to Facebook Authority. You should be redirected in next page where you need to select content types that you want to block for example select photo.


    5- Now you need to select following options according to your choice as given below in screen shot.


    6- Finally click on send.

    If you are authorized user to claim about blocking your photo using by someone other. Facebook Authority let you know by email and will take action that are required. Like and share if this is helpful for you.