Monday, September 15, 2014

Using Active Directory Snapshot and Dsamain Tool

A snapshot is a form of historical backup that captures the exact state of the directory service at the time of the snapshot was taken. You can recover deleted AD items form snapshot taken by you if the Object that you want to recover was present at the time of snapshot creation.

Step 1: Creating an AD DS Snapshot

  1. Open the command prompt.
  2. Type ntdsutil press Enter.
  3. Type snapshot press Enter.
  4. Type activate instance ntds press Enter.
  5. Type create press Enter.
  6. You should get a successful creation message with a unique GUID number for each snapshot, copy it.
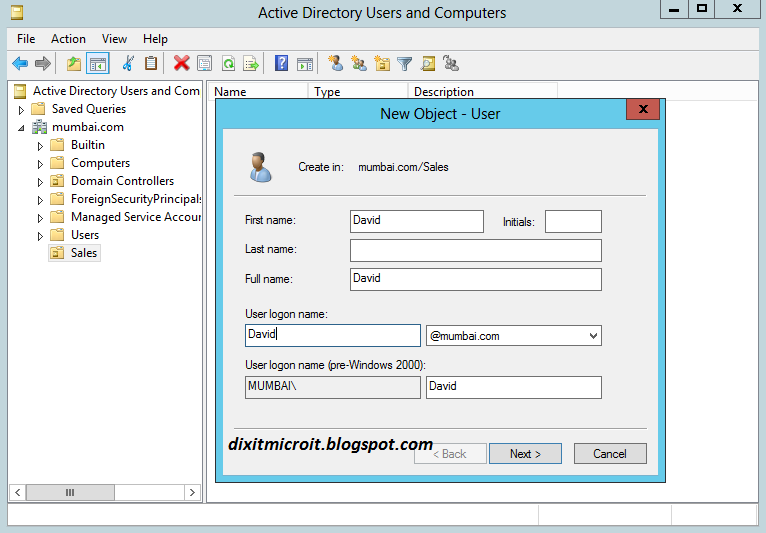
  7. Exit from the command prompt. And delete Dixit user that we have created in previous post from AD to test Snapshot.


 Step 2: Mount an Active Directory snapshot

  1. Open cmd prompt as a Admin privilege type ntdsutil (a command line utility to manage AD database).
  2. Type snapshot then press Enter:
  3. Type activate instance ntds press Enter
  4. Type list all press Enter
  5. Type mount <GUID> is the GUID returned by the Create command in Step 1.
  6. Type quit press Enter
  7. Type quit press Enter
  8. Type the following command to add your snapshot with LDAP instance.
  9. Type dsamain /dbpath C:\$SNAP_datetime_volumec$\windows\ntds\ntds.dit /ldapport 44000 press Enter


Step 3: Explore a snapshot with Active Directory Users and Computers

  1. Switch to Active Directory Users and Computers. Right-click and then click Change Domain Controller.
  2. Click <Type a Directory Server name[:port] here>, type seat2.mumbai.com:44000, and then press Enter. Click OK. (replace your domain name and port number).
  3. Double-click mumbai.com.
  4. Double-click the Sales OU.
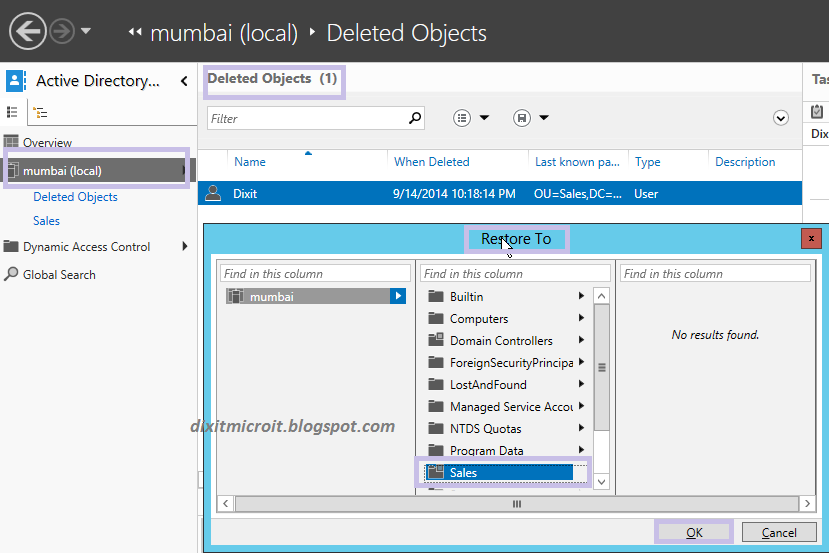
  5. Locate the Dixit user account object. Note that the Dixit object is displayed because the snapshot was taken prior to deleting it. Great You have done this.

Step 4: Unmount an Active Directory snapshot
  1. You can also unmount AD snapshot if there is no requirement for it, Follow next steps to achieve this.Open command prompt as an admin privilege and Type the following commands:
  2. Type ntdsutil press Enter
  3. Type snapshot press Enter
  4. Type activate instance ntds press Enter 
  5. Type list all press Enter 
  6. Type unmount guid (replace guid with your snapshot GUID).
  7. Type list all press Enter.
  8. Type quit and exit form cmd.


If you encounter any error kindly drop your query in the comment box.

How To Enable Active Directory Recycle Bin

Configuring the Active Directory Recycle Bin
AD Recycle Bin allow you to restore accidentally deleted AD objects without the need of restoring complete AD Database, but first of all, you need to Enable this feature. So that is what we are going to describe.

Step 1: Enable the Active Directory Recycle Bin
  1. Login to your Server, Open Server Manager, click Tools, and then click Active Directory Administrative Center (ADAC).
  2. Click (Mumbai local) (My Domain Name).
  3. In the Tasks pane (Right Corner), click Enable Recycle Bin, click OK, and then click OK.
  4. Press F5 to refresh ADAC.


Step 2: Create and delete test users
  1. Either from Active Directory Administrative Center, or from Active Directory Users and Computers
  2. Select Sales OU and create new User with the following information, and then click OK.

  •  Full name: David
  •  User UPN logon: David
  •  Password: Pass@123
  •  Confirm password: Pass@123


    1. Repeat the previous steps to create a second user, Dixit.
    2. Select Dixit. Right-click the selection, and then click Delete.
    3. Click Yes at the confirmation prompt.
    Step 3: Restore the deleted users
    1. In Active Directory Administrative Center, click Mumbai (Local), and then double-click Deleted Objects. 
    2. Right-click Dixit, and then click Restore To.


    3.In the Restore To window, click the Sales OU, and then click OK.
    4.Confirm that Dixit is now located in the Sales OU. 

    I hope you have enjoyed this new feature. Write comment if you have any query regarding this topic.

    DHCP Backup and Restore with Windows Server 2012

    The DHCP database is a dynamic database containing data that is related to scopes, address leases, exclusions and IP reservations.

    By default, the DHCP database files are stored in the %systemroot%\System32\Dhcp folder.

    You can back up a DHCP database manually, or you can configure it to back up automatically. An
    automatic backup is called a synchronous, A manual backup is called an asynchronous backup.

    Using Netsh (You can also use GUI method for same from dhcp management console)

    You can use netsh commands to back up the database; this is useful for backing up the database to a remote location using a script file.

    The following command is used to Export and import dhcp database. (DHCP data for all scopes)
    Open CMD as admin privilege and type following command.
    Syntax:
    netsh dhcp server export "c:\YourFolder\YourFile.txt" all

    Netsh utility for DHCP backup restore

    Example:
    netsh dhcp server export "c:\Database\DhcpFile.txt" all
    To restore the DHCP database, use the following command:
    Syntax:
    netsh dhcp server import "c:\YourFolder\YourFile.txt" all

    Example:
    netsh dhcp server import "c:\Database\DhcpFile.txt" all
    Nice you finished it.
    Note: If you are using this command on same server for testing purpose, kindly remove scopes from dhcp console before restoring otherwise you might get error like existing database.